Email: contact@fwpmt.com Phone: 401-574-3471
Free WordPress Tutorials
How to log into your WordPress site
To edit or update your WordPress-based website, you will need to log into it. Often, the login URL can be found at one of these two addresses:
http://your-wordpress-site.com/wp-admin
https://your-wordpress-site.com/wp-admin
As you can see, the only difference is the extra 's' for the second URL. If your site utilizes a security certificate (that's the recommended option) be sure to choose the https-based URL to access the site.
Of course, if you have installed WordPress in a directory, you will have to include it into the URL structure as well. The good news is that most web hosting panel applications, such as cPanel, will send you an email which includes the proper login URL.
If everything works as planned, you should be greeted by an image that looks like this: Input your user name and password; if the information is correct, you should see WordPress' dashboard. Make sure to choose a hard to guess user name and pass combination; people who utilize the commonly used 'admin' as their login name will have a hard time trying to keep their sites secure.
Understanding the key 'Dashboard' areas
The Dashboard is the WordPress page that shows up as soon as you log in. It's the main CMS administration page, and it includes several important sections.
You will see the name of your website in the upper left corner of the dashboard; it's 'Your WordPress Site' in the image below.
 The name of the currently logged user is displayed in the upper right corner; it's 'Joe Blogg' in the image above. You can edit the current user's profile and/or log out by hovering the mouse over the name, and then choosing the desired option.
The 'New Feature' toolbar will alert you anytime a key WordPress feature has been introduced or updated. You can hide the alerts by clicking the blue 'Dismiss' link at the bottom of the small 'New Feature' window.
Working with the Dashboard menu options
The left side WordPress menu gives you access to the most important options. My guess is that 95% of the users (the ones that don't want to tweak their WordPress installations using custom PHP code) will only use this menu to set up their sites the way they want them to be. Here are the key menu options.

- 'Posts' allows you to create a new blog post and/or customize article categories and tags;
- 'Media' allows you to upload and/or manage your multimedia files: images, videos and other files can be deleted or edited here;
- 'Pages' allows you to create and/or edit pages. Pages are very similar with posts, but they will usually have a more prominent place on your site; unlike posts, they don't 'get old' as new pages or posts are created;
- 'Comments' allows you to manage the blog posts comments; you can approve them, delete them, mark them as being spammy, and more;
- 'Appearance' allows you to customize the aspect of your site by applying various themes and/or playing with the existing widgets;
- 'Plugins' allows you to extend the functionality of your WordPress-based site. Use this option to add the needed plugins, or deactivate and delete the ones that are already installed;
- 'Users' allows you to see all the users who have registered an account on your site. You can add more users, manage their roles, etc;
- 'Tools' gives you access to various tools. The option of importing and exporting your settings, which gives you the ability to create similar WordPress sites really fast, can be found here as well.
The WordPress Toolbar: a quick introduction
WordPress' Toolbar gives you quick access to the CMS' commonly used features. The toolbar will only be displayed at the top of the screen after you log into the site. This means that your website visitors won't see it, of course.
By clicking the toolbar, you can get access to these features and options: - WordPress help, which can be found on the official site, the Codex or the user forums; - Dashboard, which allows you to access the most common customization options; - Various website settings, such as the ones that allow you to change the background and header images; - The ability to add new posts, pages and users; - The option of viewing, approving and rejecting blog comments; - User profile updates; - Website searches.
Making use of WordPress posts
The CMS can create user-defined posts and pages. Most posts are blog entries, with the most recent ones being displayed at the top of the list. On the other hand, pages are utilized for content that doesn't change too often – a "Contact" information resource, for example.
Posts are helpful even for people who don't blog, because they are perfect for displaying the most recent company news and updates or serve as a diary, for example. Any topic that gets updated every now and then can be displayed on the site by making use of WordPress posts.
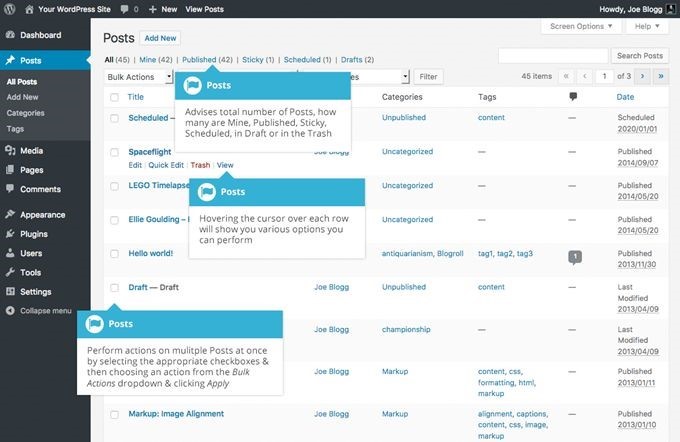
Simply click the 'Posts' entry in the left side menu to display a list with all the existing posts. You will see the post title, its author, categories, tags, comments and the 'published' or 'scheduled' dates (for the posts that haven't been published yet).
Hover your mouse over a post title, and then you will get access to several options: - 'Edit' will give you the option to modify the content of the post; - 'Quick Edit' allows you to change the post title, its publishing date, etc; - 'Trash' gives you the ability to delete that particular post; - 'View' displays the content of that post.